Refugio Jakob: Paradise on Earth
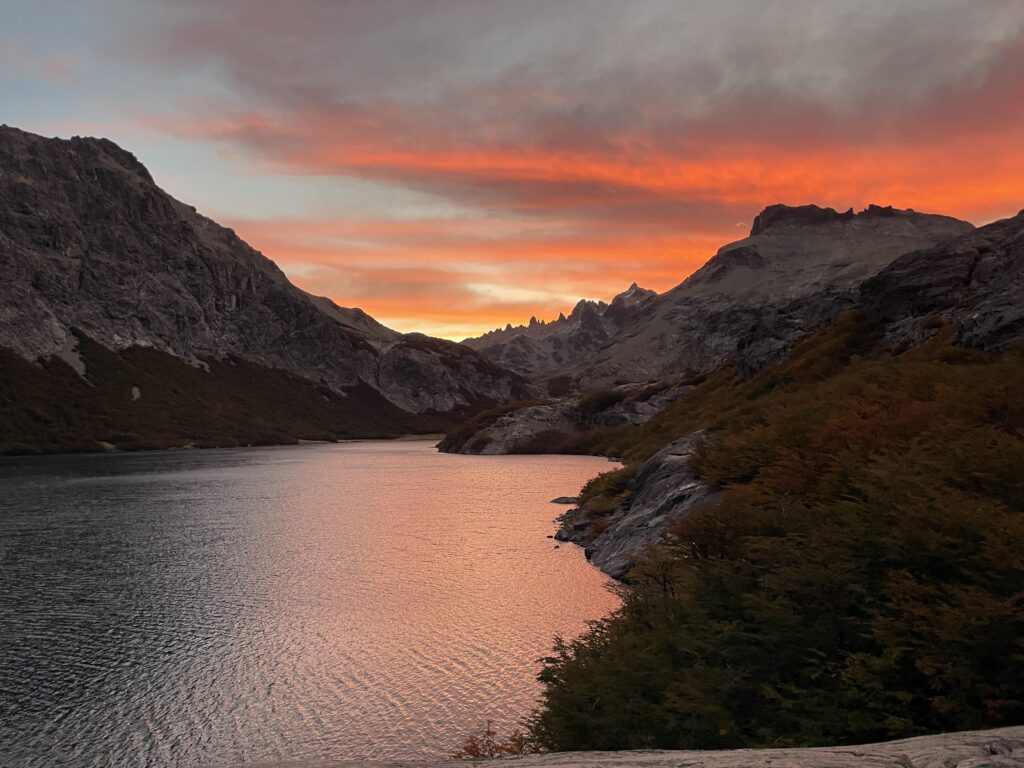
The hike to Refugio Jakob (also known as Refugio San Martín) was our absolute favorite hike in Bariloche. The views are absolutely phenomenal, and we witnessed one of the most beautiful sunsets we’ve ever seen!
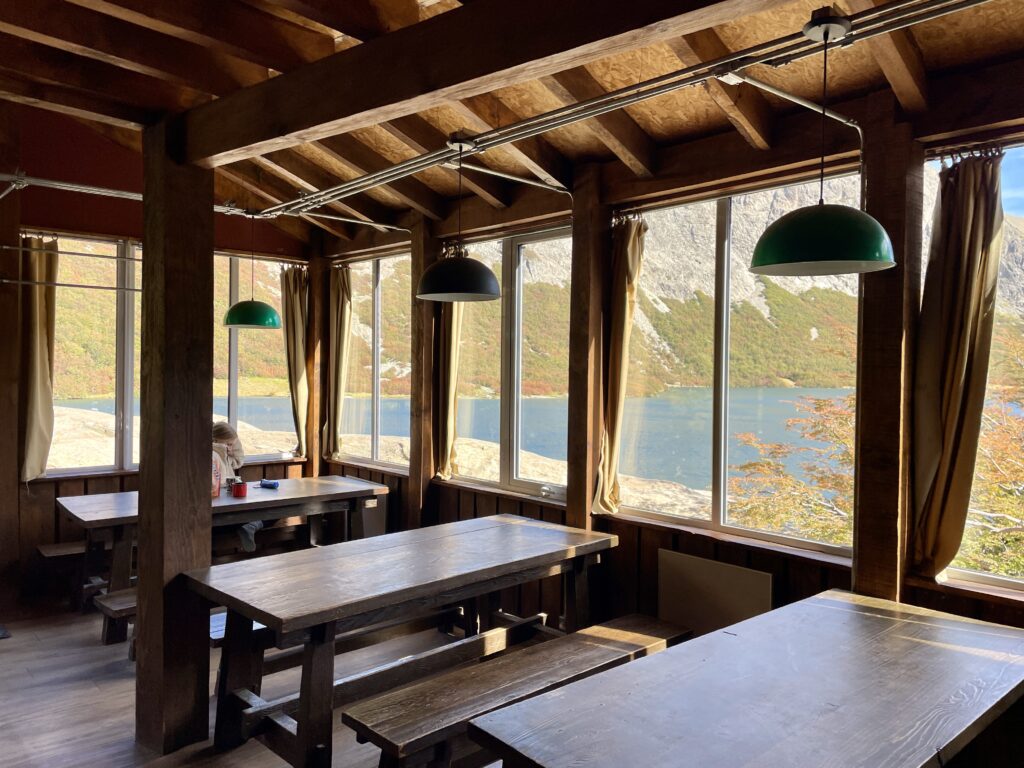
This is one of those travel experiences that had us grinning from ear-to-ear, pinching ourselves, and having to remind each other that this was indeed real life. We could have spent hours just relaxing at the lodge with a cup of hot cocoa and a nice book.
Refugio Jakob is the second stop on many peoples multi-day treks between the various refugios, but this can be done as a fairly simple day hike. Don’t miss out on one of the best hikes in Argentina!
Please note that some of the links below may be affiliate links, and at no additional cost to you, we earn a commission if you make a purchase.
Know Before You Go
- Any trash you bring up, you must bring down!
- You must register your intentions for trekking with the national park
- Reservations for staying in Refugio Jakob are “required”. They probably won’t turn you away (unless they’re full), but the only way to 100% claim a bed is with a prior reservation. Make your reservations here!
- You do not need a Mercado Pago account to pay with a debit or credit card for your reservation. This might not work perfectly the first time but keep trying!
- BRING CASH! While you can make your reservation for a bed with card, they don’t have internet so they cannot process card payments for food at the Refugio.
- You’ll have no cell service for most of the hike, so download the GPX file or trail on AllTrails before going!
- Bring a sleeping bag and inflatable pillow. While they do sometimes have extras, they are not as abundant as they are at Frey!
- Food and drinks are a little more expensive at Refugio Jakob than they would be in town. The dinner is 100% worth it, but I would bring your own food for breakfast and lunch.
- Fires are not allowed, but gas stoves are!
- If you’re planning on going to another refugio, Refugio Jakob receives the next day’s weather forecast at 8 pm so you can double check it’s safe to proceed with your trek!
How to Hike to Refugio Jakob
There are a few different options for hiking to Refugio Jakob. Each is beautiful in their own unique way, and they vary in difficulty. Read below for the best route for you!
The distances and times listed below are for one-way treks, not round-trip!
Option #1: From Refugio Frey
- Difficulty: Medium
- Time: 4.5-6.5 Hours
- Distance: 8.5 km
This is the most common way to hike to Jakob and the way that we chose to do it! We’ll go into more details about this route in the following section.
You can also read all about how to get to Refugio Frey in this post!
Option #2: Via Cerro Catedral Filo
- Difficulty: Medium
- Time: 5-8 Hours
- Distance: 10.2 km
The most popular way to hike the Cerro Catedral Filo route is to take the Amancay Cable Car from the base of Cerro Catedral followed by the Diente de Caballo Chairlift to the start of the hike. The cable car is open every day except Sunday from 9 am to 4 pm and costs around $28 USD.
You can check if the cable car and chairlift are running here. Go to the “Estado de medios y pistas,” scroll down to “Peatones,” and the cable car and chairlift will be listed under Medios.
This route involves hiking along the ridge, walking through a beautiful valley, and hiking up some intense incline before descending to Refugio Jakob.
Option #3: From Tambo Trailhead
- Difficulty: Easy
- Time: 4-6 Hours
- Distance: 18 km
The hike from the Tambo Trailhead to Refugio Jakob is super easy and took us just under 4 hours to do in reverse. It requires the smallest bit of scrambling (about 5 minutes) close to the refugio, but other than that it’s a relatively flat, well-marked path with with and blue markers. It’s a beautiful walk, but the hike from Refugio Frey undoubtedly has better views.
Option #4: From Laguna Negra
- Difficulty: Hard
- Time: 8-10 Hours
- Distance: 9.8 km
Though it is possible to trek from Refugio Laguna Negra to Refugio Jakob, we do not recommend this. If you’re going to visit both refugios, it’s recommended to do this in the opposite direction and start at Refugio Jakob, though this is also a very difficult hike. We discuss more about the four refugio hike and our recommendations towards the end of this post.
Everything you Need to Know about the Hike from Frey to Jakob
If you’re hiking from Refugio Frey to Refugio Jakob, we recommend rising early and hitting the trail sometime between 9 and 10 am. This gives you ample time to enjoy this absolutely stunning hike and have time to enjoy Refugio Jakob before sunset. This section will go over all of the different pieces of the trek so you know what to expect!
Frey to Laguna Schmoll
In my opinion, the first 30-45 minutes of this hike were the hardest. The trail starts at the opposite side of the lake from Frey, where you’ll do a pretty steep incline up to Laguna Schmoll. This was definitely the most tiring part of the whole trail for me, which I guess is good to get out of the way early!
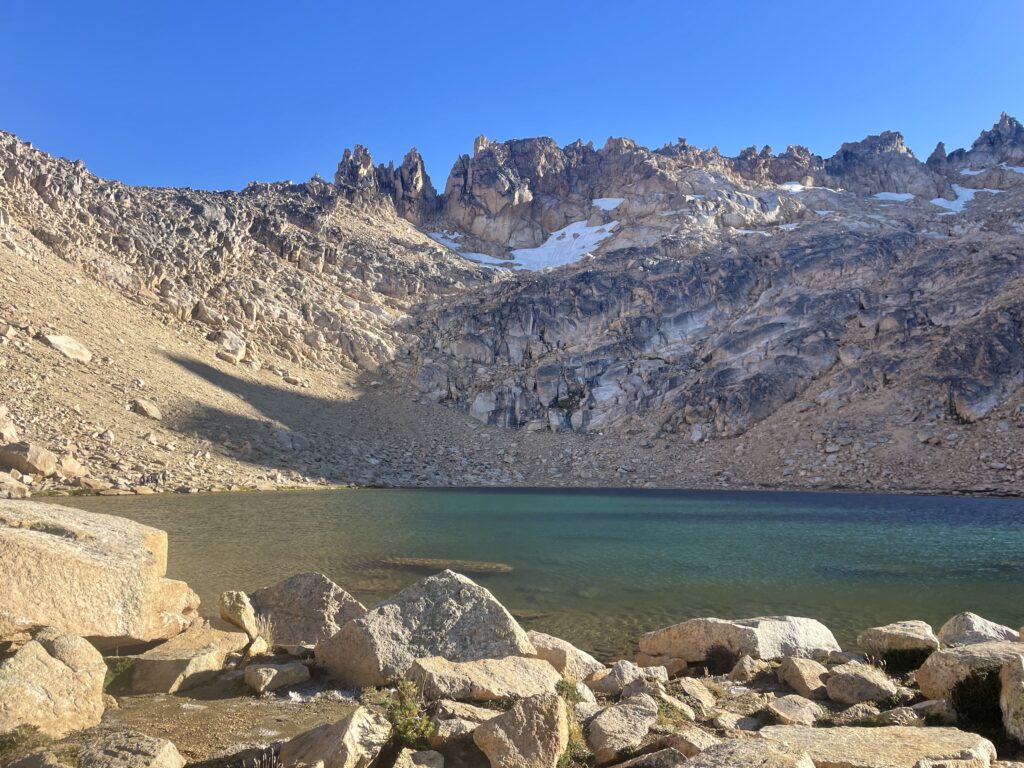
Laguna Schmoll to the Top of Ridge #1
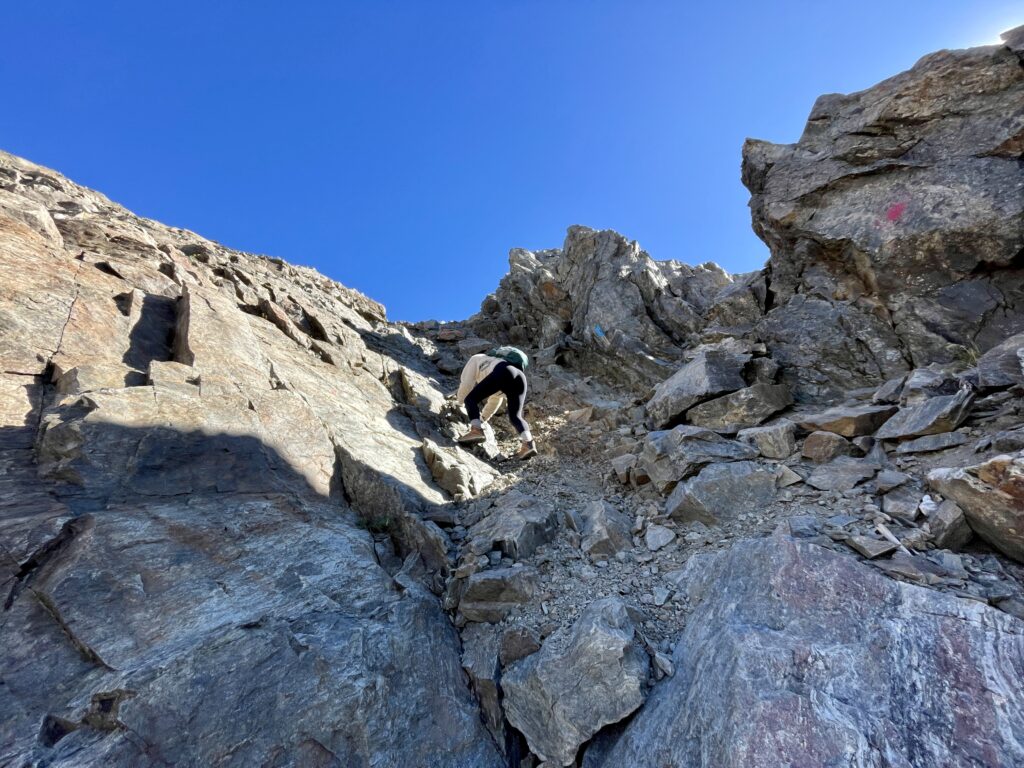
Once you reach Laguna Schmoll, you’ll have another 30 minute hike up to the top of the first ridge. This part will feel a lot like rock climbing, where you’ll use your hands to pull yourself up. This may sound daunting, but honestly I found this part of the trail to be super fun and not dangerous at all – just make sure to follow the red dots!
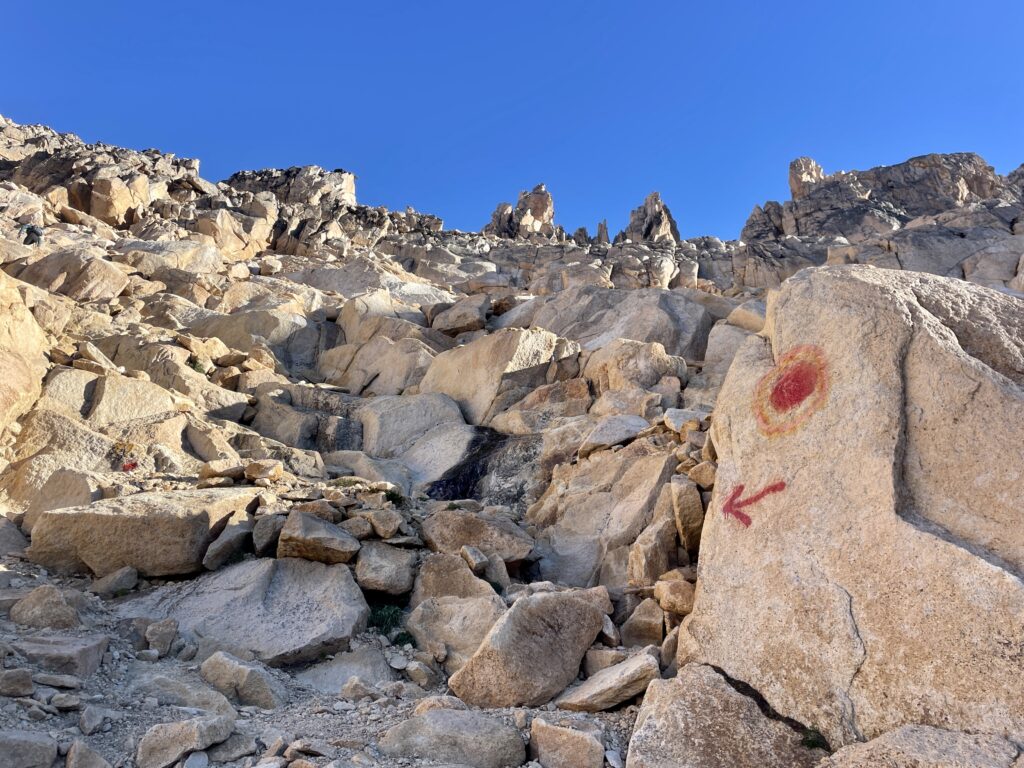
Top of Ridge #1
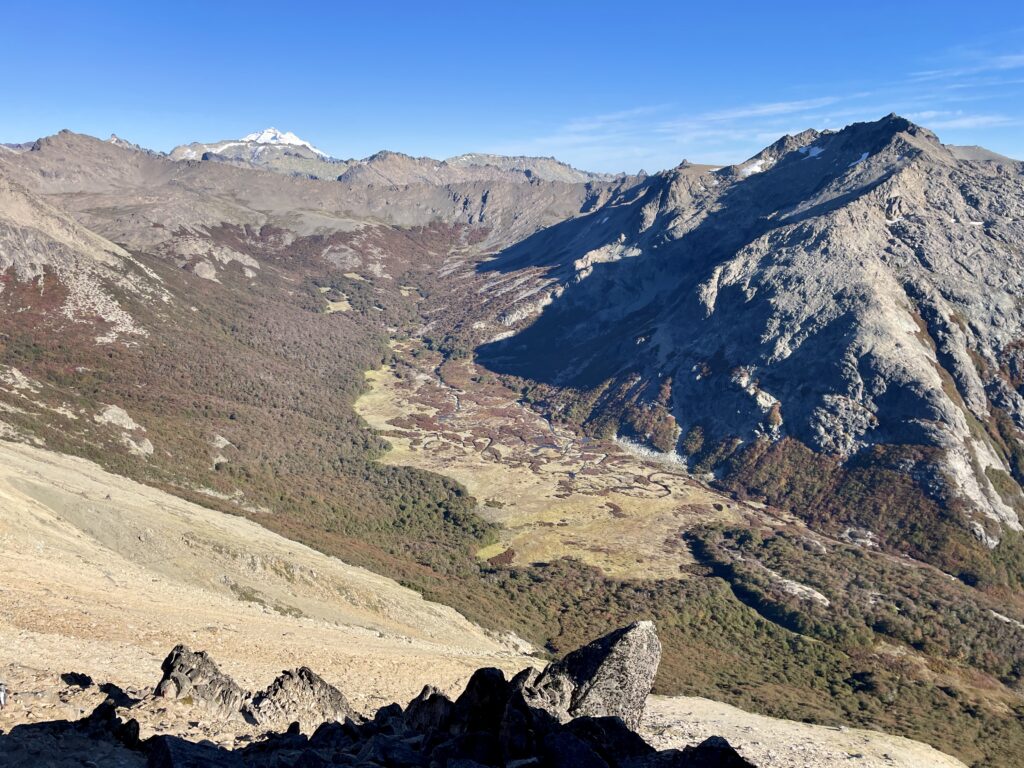
Once you reach the top of the ridge, you’ll have a view of Tronador in the distance and the valley below which you’ll be hiking across! This is also the point when you’ll see signs pointing left for Refugio Jakob and right for the Filo Cerro Catedral trail.
Top of Ridge #1 Down to the Valley
This next part involves hiking (or maybe sliding is a better word!) down to the valley. It takes about an hour to get down to where the trail turns more into a trail again, where you’ll likely want to stop and empty your shoes from all the tiny rocks that will inevitably be in them! Be careful on this part of the trail; the small, loose rocks cause the trail to be pretty slippery.
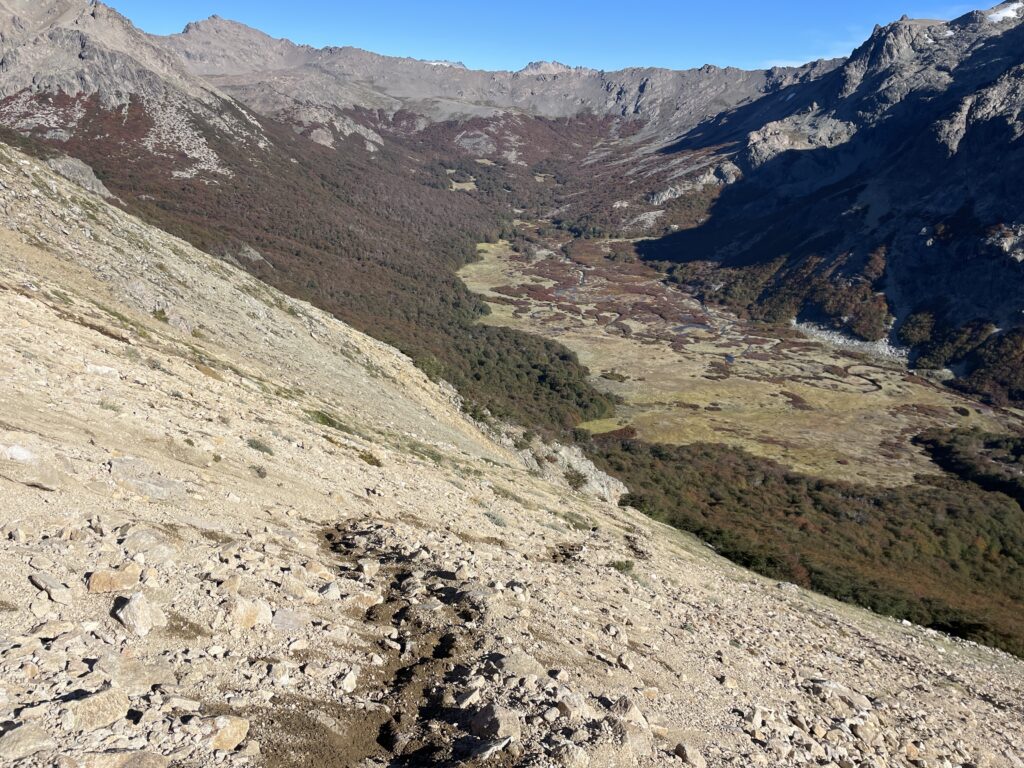
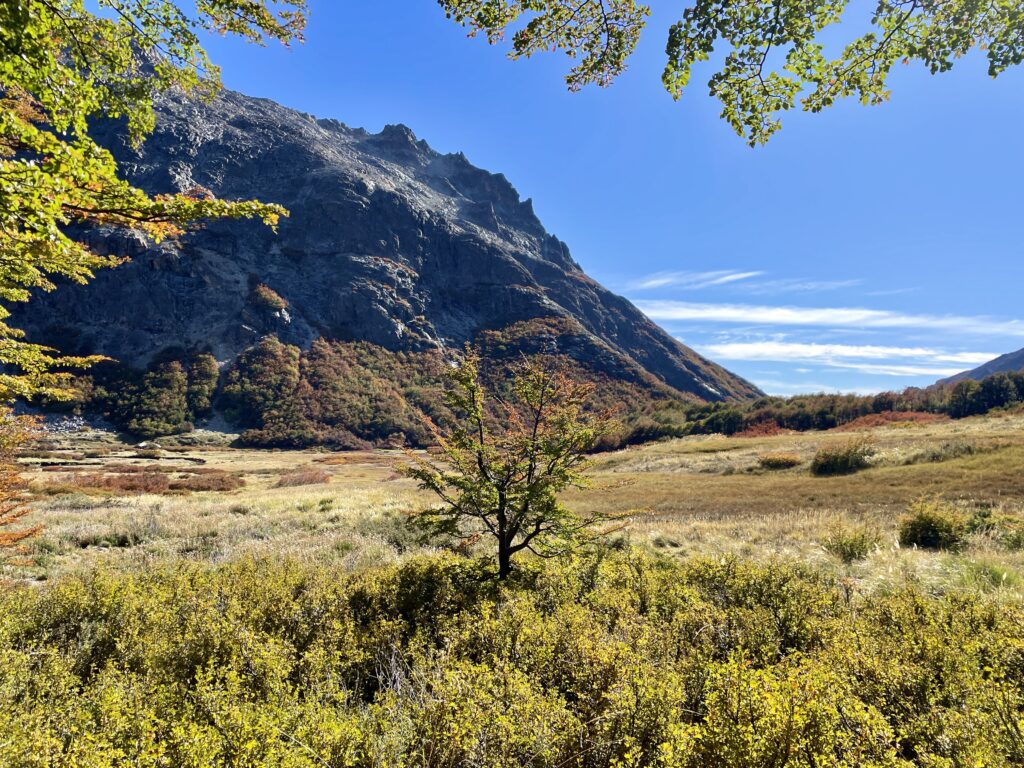
Through the Valley
Once you reach the bottom of the super loose rock part, you’ll have a nice hour or so of walking through the valley. This is a great spot to stop for lunch as you’ll have the shade of the trees and protection from the wind. Up to this point, the markers were only red, but here they start to use blue as well. They both lead the same way, so just follow either color!
Valley to the Top of Ridge #2
After about an hour of an easy walk through the valley, you’ll get to the start of a slow incline that will get rockier and steeper as you go. From this point, it’ll take about 60-90 minutes to get up to the top of ridge #2, with a much steeper part at the end where you’ll feel a bit like the trail is vertical. This still didn’t feel unsafe, just take it slow!
Top of Ridge #2
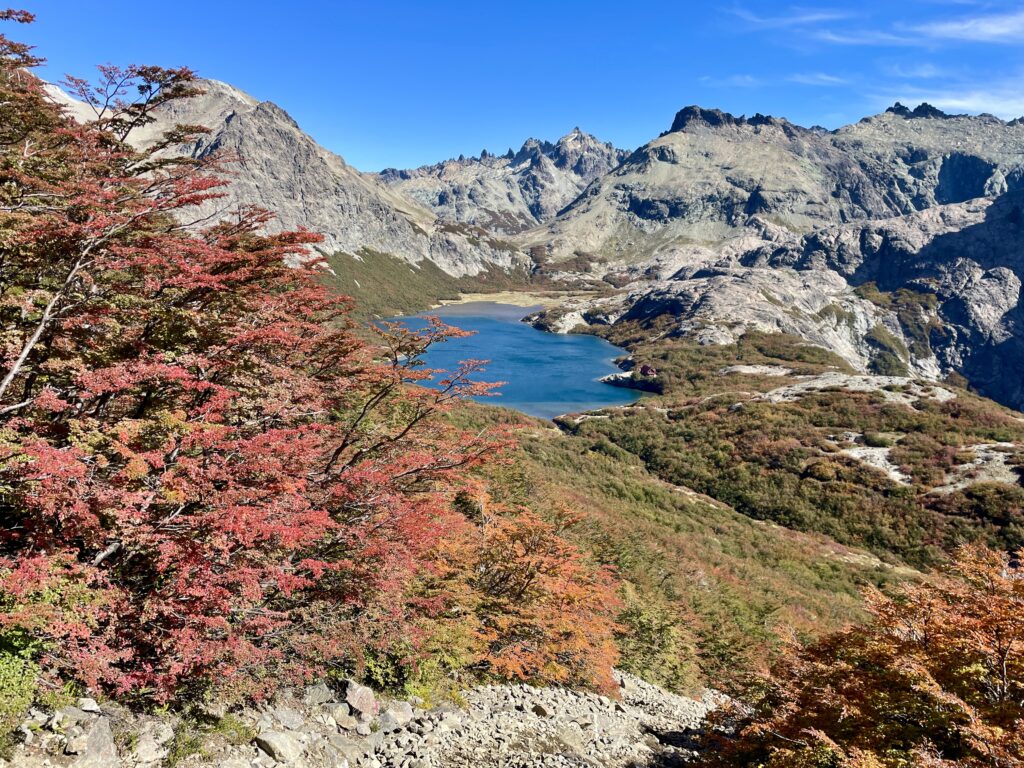
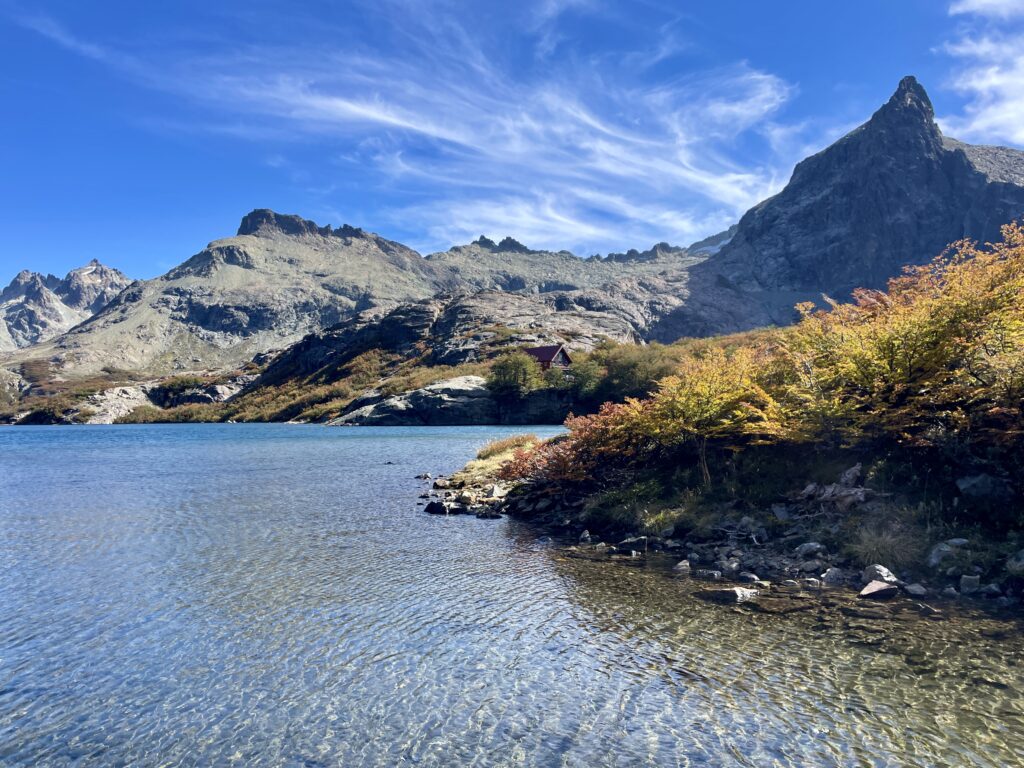
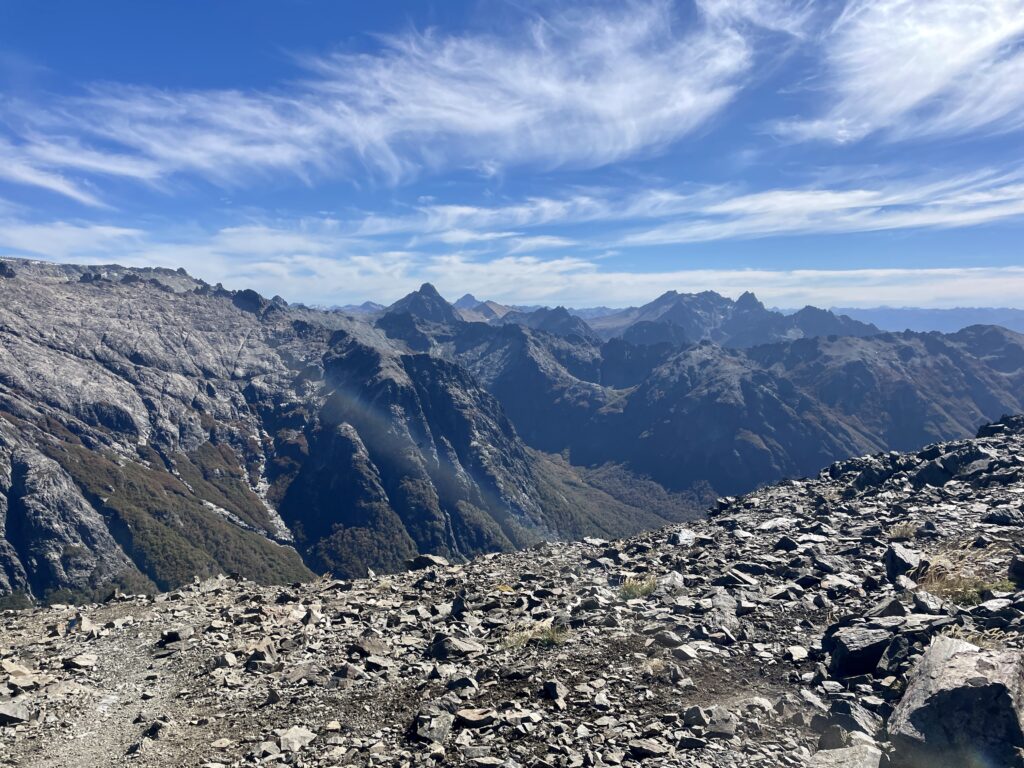
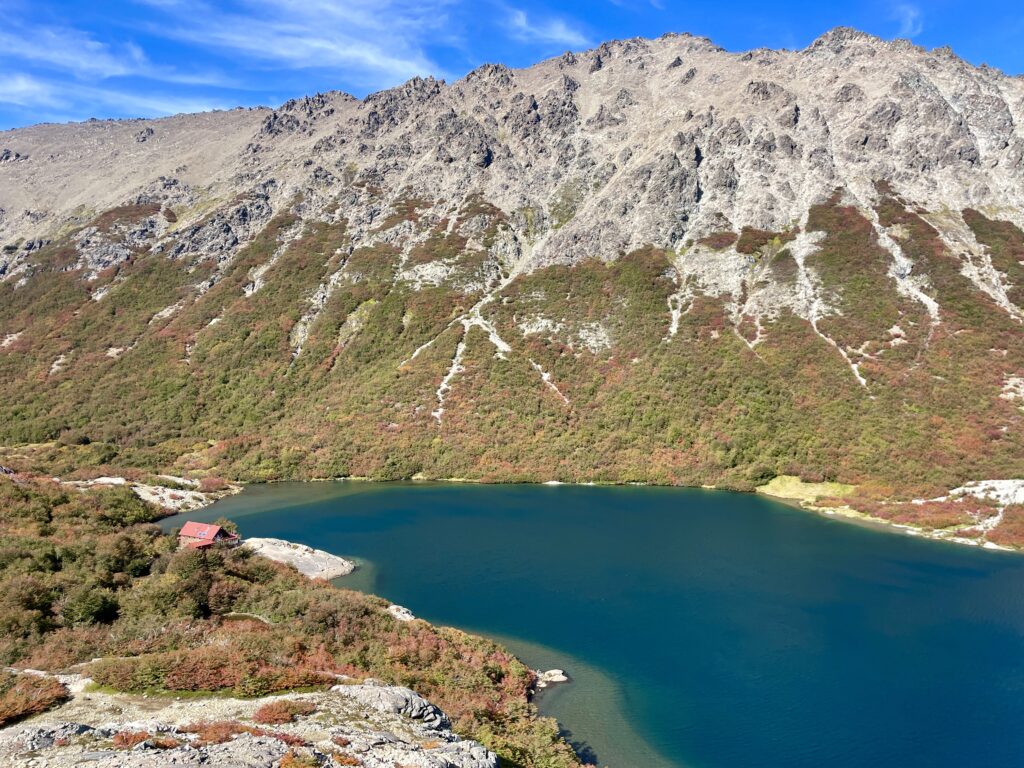
From the top of Ridge #2, you’ll have amazing views. From up here, it looks like the mountains literally go on forever. You’ll also be able to spot Refugio Jakob for the first time, hugging the side of the lake. At this point, all of the uphill is done, and you just have one last descent!
Hike Down to Refugio Jakob
Even though you can see Refugio Jakob by now, this last chunk of the hike is not super easy. Similar to the descent down the first ridge, this descent will also be full of lots of loose rock. However, here, the rocks are a bit bigger, so you can’t just slide down it like you could the other one. Really be careful with your footing here to make sure no one gets any rolled ankles!
Though this part of the trail is tough, it’s also the part of the trek where we found the best views. It was just incredible. So make sure to take a break from watching your feet to look up every once in a while! It took us about an hour of climbing down this trail to get to the bottom where it became more of a trail again, from where you’ll just have a nice 15 minute walk to the refugio!
Welcome to Refugio Jakob
At this point, after about a 4.5-6.5 hour hike, you’ve made it! Now is the time to sit and relax in Refugio Jakob, read a book, play some games, and maybe have a bottle of wine! Whatever you do, make sure you’re awake for the sunset – I hope you get as good of one as we did!
Best Time to Hike to Refugio Jakob
The best time to hike to Refugio Jakob is between spring and fall, when there is little to no snow on the ground. Patagonia’s seasons are opposite of North America’s and Europe’s, so the winter months are between mid-June and mid-September. Their autumn is mid-March to mid-June, and with the changing colors, this hike is absolutely gorgeous – we did this hike mid-April and it was breathtaking. You can still hike to Refugio Jakob in the winter, but you need to check the conditions and if the Refugio is even open. Check the weather on Cerro Catedral here!
Refugio Jakob Cost
Hiking to and hanging out in the refugio doesn’t cost anything, but staying overnight and eating does! Check the updated price list here!
If you plan on living in Bariloche and frequenting the refugios, consider becoming a member of Club Andino, which gives you discounts on your stays at the refugios!
Our Thoughts on Refugio Frey versus Refugio Jakob
Refugio Jakob is better than Refugio Frey without a doubt. The one piece where Refugio Frey has the upper hand is the distance to walk to the bathroom – they’re much farther away at Refugio Jakob (but not unmanageable), just don’t drink too much water close to bed! In all other aspects, Refugio Jakob is the undisputed winner. It’s far less crowded than Frey, the bedrooms are all 2 sets of bunk beds rather than Frey where there are just lines of mattresses and everyone’s in the same room, and the common area of Jakob is MUCH nicer and larger than Frey’s. This isn’t to say that you should skip Frey entirely, but if you have the chance to go to Jakob, take it.
How to Get to/from the Tambo Trailhead
The easiest way to get between the Tambo Trailhead and Bariloche is to Uber. Ubers in Bariloche are really cheap, and the lack of a direct bus between Bariloche and Tambo makes this an easy option.
How to Get to/from the Tambo Trailhead by Bus
If you don’t mind doing a bit of walking, you can take the any of the 10 buses or the 20, 51, 13B, or 13-22A bus from Bariloche to Av. Bustillo 12.400 and walk the rest of the way to the trailhead, which takes just over an hour. The easiest way to find the best bus for you to take is to plug Av. Bustillo 12.400 into Google Maps and see where the nearest bus stop is.
To use the buses in Bariloche, you need a SUBE card. Find places to buy and recharge your SUBE card using this map. Worst case scenario, you can pay someone to use their SUBE card, but this is not a guaranteed option. Make sure to wave down the bus so it stops, and scan your SUBE to pay. When it’s almost time to get off, press the button on the railings near the rear door to alert the driver to stop at the next stop.
Packing List for Overnight at Refugio Jakob
Patagonia Bike Trips is a great place to rent camping gear in Bariloche, including sleeping bags, mats, stoves, and tents!
- Purifying Larq Water Bottle
- Toilet paper or baby wipes – TRUST US!
- Windbreaker
- Winter jacket and layers
- Change of clothes (optional)
- Hand Sanitizer or Soap (none provided)
- Snacks
- Sleeping Bag (you can also rent one for $5, although they don’t always have them available)
- Inflatable Pillow (or something you can use as a pillow; they’re not provided)
- Hiking poles
- Single Burner Gas Stove if you want to do any cooking
- Tent and camping equipment if you plan on camping
A Note on the 4-Refugios Nahuel Huapi Traverse
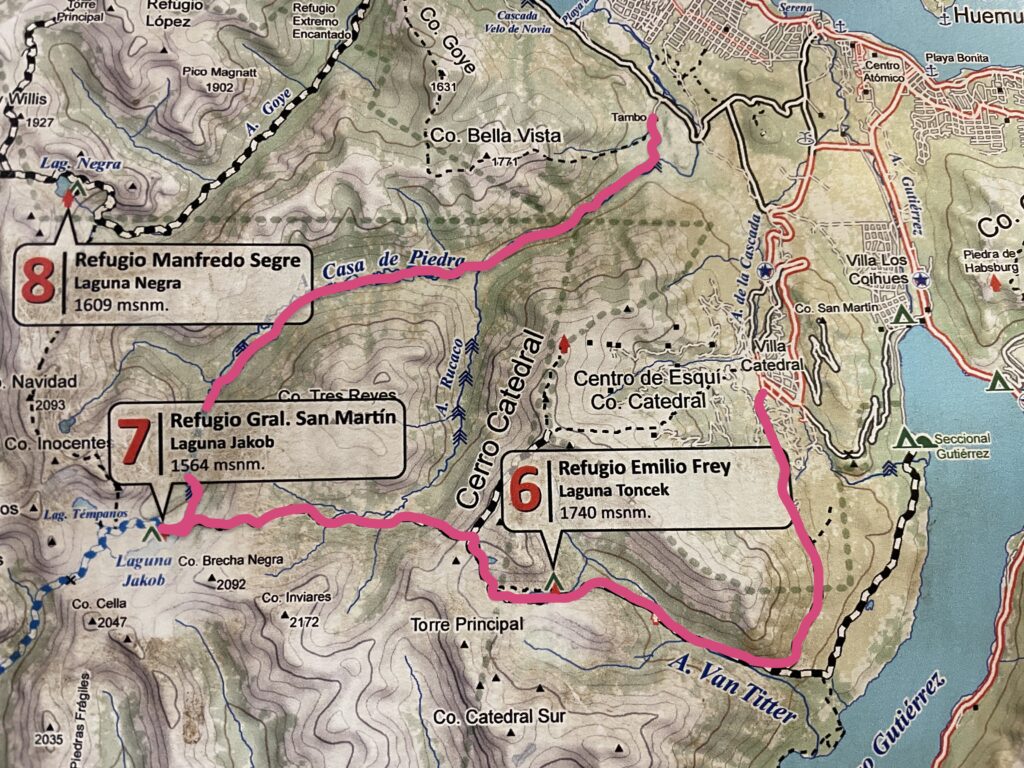
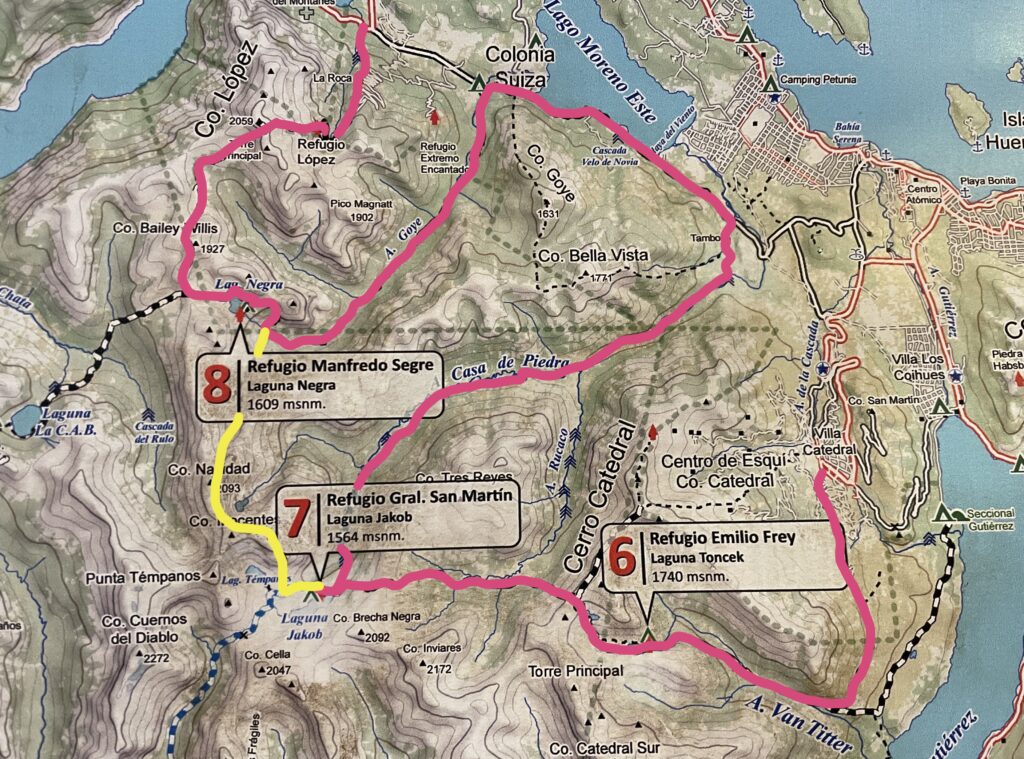
A trek that you may have read about if you’re traveling to Bariloche is the 4-Refugios hike commonly done over the course of 4 or 5 days (depending on whether or not you stay at Lopez – most people don’t). The most popular route is Frey -> Jakob -> Laguna Negra -> Lopez. When we were in Bariloche, we did a shortened version of this trek over 3 days and 2 nights, staying at Refugio Frey and Refugio Jakob. This was in part due to the questionable weather (we visited during the fall, where the weather tends to be rainy), and due to the difficulty of the trek from Refugio Jakob to Refugio Laguna Negra (also known as Refugio Italia Manfredo Segre). You can see the route we took below.
We’d read multiple accounts of the trek between Jakob and Laguna Negra requiring a good amount of scrambling and essentially rock climbing, with the trek made even more difficult by the lack of markers. Helmets are highly recommended for this part of the trek due to the falling rocks from the strong winds. We met a group of people doing this trek when we were at Refugio Jakob, and they had hired a guide to do just that leg of the trip with them. We highly recommend doing the same if you want to do this.
If you want to visit all of the refugios and want to skip that leg of the trek, we recommend heading from Refugio Jakob to Colonia Suiza (near the Tambo Trailhead) and staying there for the night before hiking up to Laguna Negra. This will extend the trip by a night, but it’s definitely the safest option if you want to avoid any issues! You can see a map of our suggested trail (in pink) below, with the yellow portion mapping the trek between Jakob and Laguna Negra.
Keep Exploring Bariloche…
- Your Ultimate Guide to Bariloche’s Route of the 7 Lakes
- Wonderful Things to do in Bariloche, Argentina
- Hiking to Refugio Frey: Your Complete Guide
- Cerro Campanario: The Absolute BEST View in Bariloche
- Hiking Cerro Llao Llao in Bariloche: Your Complete Guide
- Travel Guide for Cerro Otto in Bariloche: Hiking, Activities and More!
- The Complete Guide to the Mirador Lago Gutiérrez Hike
- How to Exchange Money in Argentina: Your Complete Guide to the Argentina Exchange Rate
Our Favorite Travel Resources
Accommodations: We use Booking.com for hotels and HostelWorld for hostels. We also use VRBO or TrustedHousesitters for longer stays.
Flights: We recommend using Skyscanner to find the cheapest and best flights.
Ground Transport: We use 12Go and Omio for buses and private transfers, and rentalcars.com and Discover Cars for rental cars.
Activities: GetYourGuide and Viator are the best websites for booking organized tours.
International Medical Insurance: We highly recommend SafetyWing for Digital Nomads and HeyMondo for those not traveling full-time, or who frequently engage in higher-risk adventure activities.
eSIM: We recommend Airalo or Holafly for getting data internationally.
Check out our Travel Resources Page for more of our favorite travel-related products and services!